 Creating columns and pilasters
|
Mode |
Tool |
Workspace: Tool set |
|
Modes for The Symbol Insertion tool |
Column
|
Landmark, Spotlight: Building Shell (basic column) Architect: Building Shell (additional capabilities) |
|
Modes for The Symbol Insertion tool |
Pilaster
|
Architect: Building Shell |
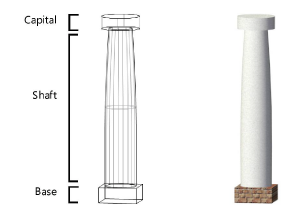
A basic column can be drawn in Landmark and Spotlight. In the Vectorworks Architect product, columns and pilasters can be architectural in nature, structural in nature, or both, and the architectural and structural components can be created using a material resource for an efficient BIM workflow. Use the Column tool or Pilaster tool to draw an object that not only reflects the architectural appearance of a column/pilaster, but also defines it in structural terms that can be used in an engineering analysis of the building. Structural and architectural elements can be displayed or hidden. The column ID can also, optionally, be placed on the drawing. Additionally, in the Architect product, the column/pilaster can be exported to IFC format for exchange with structural analysis programs.
A pilaster can be placed in a wall; a column cannot. A pilaster inserted in a wall can set its architectural height relative to the wall.
To create a column or pilaster:
Click the tool and the symbol insertion and alignment modes.
Do one of the following:
Click Active Def on the Tool bar to select a resource from the Resource Selector.
Click Preferences to open the object properties dialog box and specify the tool’s default parameters.
The parameters can be edited later from the Object Info palette.
Click on the drawing to place the object, and click again to set the rotation.
To create a circular or square shaft, capital, or base, enter the same value for the width and depth.
Optionally, after placement you can create a plug-in object style, which combines style parameters (with a fixed value established by the style) and instance parameters (which can be set independently for each instance of the styled object in the drawing). See Standard plug-in object styles without catalog options.
Basic column parameters
The basic column object is available with the Vectorworks Landmark and Spotlight products.

Click to show/hide the parameters.Click to show/hide the parameters.
|
Parameter |
Description |
|
Rotation |
Specifies the number of degrees to rotate the object (0.00 is horizontal) |
|
Text Style |
Select a text style from a library or the current file. To use the style defined for the object’s class, select <Class Text Style>. To format the text using options on the Text menu, select <Un-Styled>. See Using text styles and Formatting text. |
|
Style |
Replace, remove, or edit the current style, or create a new plug-in object style for this object. Editing a style changes all instances in the file that use the style. |
|
Hide Style Parameters |
Hides the parameters that are set by style; these cannot be edited from the dialog box or Object Info palette |
|
Use Center Marks |
Select this option to size the cross at the column insertion point and enter the Center Mark Size |
|
Height |
|
|
Height |
Directly sets the desired height of the column, including base and capital (if any). When the column height is determined manually by this method, the Top Bound property of the column is automatically set to Layer Elevation, and the Top Offset value is modified accordingly. When the top of the column is bound by the layer wall height value, the wall height updates automatically. |
|
Top Bound |
Sets the vertical reference that determines the top of the column. The Layer Wall Height value is set by the design layer (see Setting design layer properties). Additional options are available for the Vectorworks Architect product. |
|
Top Offset |
Sets the offset of the top of the column from its specified top bound height. If setting the boundary of the top of the column to the layer elevation, enter the column’s height for the Top Offset; if setting the height of the top of the column to the default wall height, specify any offset above or below the layer’s default wall height. |
|
Bot Bound |
Sets the vertical reference that determines the bottom of the column; Layer Elevation is the only option available unless the Vectorworks Architect product is installed |
|
Bot Offset |
For the bottom of the column, sets the offset from the layer elevation |
|
Shaft Type |
Select to draw the column with an oval or rectangular shaft type |
|
Shaft Width |
Enter the shaft width |
|
Shaft Depth |
Enter the shaft depth |
|
Shaft Corner Radius |
For rectangular shaft type, enter the corner radius of the shaft |
|
Shaft Taper |
Select whether to draw the column with a classic or straight taper, or no taper |
|
Taper Width |
For a straight or classic taper, enter the taper width |
|
Taper Depth |
For a straight or classic taper, enter the taper depth |
|
Use Capital |
Select whether to add a capital to the column |
|
Capital Type |
Select to draw the column with an oval, oval mushroom, rectangular, or rectangular mushroom capital |
|
Capital Width |
Enter the capital width |
|
Capital Depth |
Enter the capital depth |
|
Capital Height |
Enter the capital height |
|
Capital Corner Radius |
For rectangular capital type, enter the corner radius of the capital |
|
Use Base |
Select whether to add a base to the column |
|
Base Type |
Select an oval or rectangular base type |
|
Base Width |
Enter the base width |
|
Base Depth |
Enter the base depth |
|
Base Height |
Enter the base height |
|
Base Corner Radius |
For rectangular base type, enter the base corner radius |
|
Base Divisions |
Enter the number of divisions for the base |
|
Divider Depth/Height |
For more than one base division, enter the depth and height for each divider |
|
Click to open the Classes/Materials dialog box to select the class to use for rendering the 3D shaft, capital, and base of the column |
|
|
Shaft Finish |
Displays the class to use for rendering the 3D shaft (selected in the Classes/Materials dialog box) |
|
Capital Finish |
If Use Capital is selected, displays the class to use for rendering the 3D capital (selected in the Classes/Materials dialog box) |
|
Base Finish |
If Use Base is selected, displays the class to use for rendering the 3D base (selected in the Classes/Materials dialog box) |
 Architect column and pilaster parameters
The architectural column and pilaster objects are available with the Vectorworks Architect product.

Click to show/hide the parameters.Click to show/hide the parameters.
|
Parameter |
Description |
|
Rotation |
Specifies the number of degrees to rotate the object (0.00 is horizontal) |
|
Text Style |
Select a text style from a library or the current file. To use the style defined for the object’s class, select <Class Text Style>. To format the text using options on the Text menu, select <Un-Styled>. See Using text styles and Formatting text. |
|
Style |
Replace, remove, or edit the current style, or create a new plug-in object style for this object. Editing a style changes all instances in the file that use the style. |
|
Hide Style Parameters |
Hides the parameters that are set by style; these cannot be edited from the dialog box or Object Info palette |
|
Use Center Marks |
Select this option to size the cross at the column/pilaster insertion point and enter the Center Mark Size |
|
Use Component |
Select whether to use only architectural components, only structural components, or a combination of architectural and structural components for the column/pilaster. Depending on the selection, different options are available. When both Architectural and Structural components are selected, the height, attributes, and materials of the architectural and structural components can be set individually. |
|
Use Wall Height (Pilaster only, inserted in wall) |
For Architectural Only or Architectural and Structural components, draws the architectural pilaster height equal to the wall height. This option is only available when a pilaster has been inserted into a wall. If a wall is set according to a top and bottom boundary level, pilasters inserted into the wall are in effect also set by boundary level. |
|
Height (Architectural Only or Structural Only) |
Directly sets the desired height of the column/pilaster’s architectural or structural component, including base and capital (if any). When the height is determined manually by this method, the Top Bound property of the column/pilaster is automatically set to Layer Elevation, and the Top Offset value is modified accordingly. When the top of the column/pilaster is bound by the layer wall height value or by a story level, the column/pilaster height updates automatically. |
|
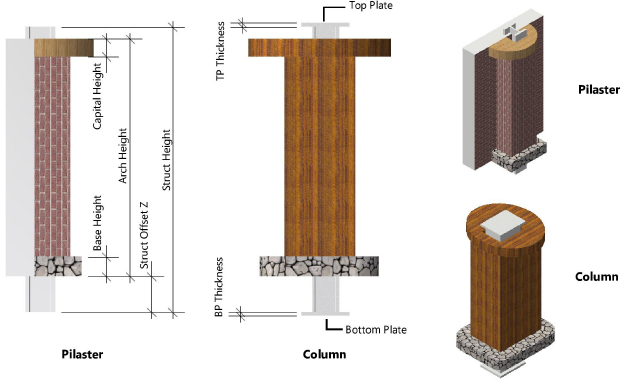
Arch Height (Architectural and Structural) |
When architectural components are included with structural, directly sets the desired height of the column/pilaster’s architectural component, including base and capital (if any). When the height is determined manually by this method, the Top Bound property of the column/pilaster is automatically set to Layer Elevation, and the Top Offset value is modified accordingly. When the top of the column/pilaster is bound by the layer wall height value or by a story level, the column/pilaster height updates automatically. |
|
Struct Height (Architectural and Structural) |
When structural components are included with architectural, directly sets the desired height of the column/pilaster’s structural component, including top plate and base plate (if any). When the height is determined manually by this method, the Top Bound property of the column/pilaster is automatically set to Layer Elevation, and the Top Offset value is modified accordingly. When the top of the column/pilaster is bound by the layer wall height value or by a story level, the column/pilaster height updates automatically. |
|
Top Bound |
Sets the vertical reference that determines the top of the object. The Layer Wall Height value is set by the design layer (see Setting design layer properties). Additional options are available for the Vectorworks Architect product. The top of the object can be bound by one of the story levels defined for the story or the story above it. By setting the top of the object to a level type, if the elevation of the associated story changes, the height of the object changes automatically to match. |
|
Top Offset |
Sets the offset of the top of the object from its specified top bound height |
|
Bot Bound |
Sets the vertical reference that determines the bottom of the object; Layer Elevation is the only option available unless the Vectorworks Architect product is installed. Additional options are available for the Vectorworks Architect product. The bottom of the object can be bound by one of the story levels defined for the story or the story below it. By setting the bottom of the object to a level type, if the elevation of the associated story changes, the height of the object changes automatically to match. |
|
Bot Offset |
For the bottom of the object, sets the offset from its specified bottom bound height |
|
Arch. Comp. Class |
For Architectural Only or Architectural and Structural components, displays the class for the architectural components of the column/pilaster (selected in the Classes/Materials dialog box) |
|
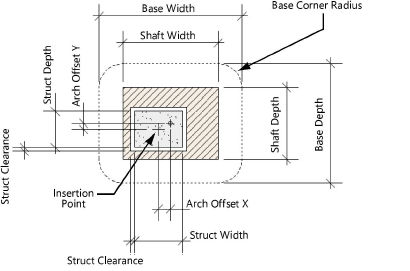
Arch Offset X/Arch Offset Y (Column only) |
For Architectural and Structural components, specify the distance to offset the architectural component of the column from the insertion point, in the X and Y directions. The 2D column’s insertion point always coincides with the center marks (if any) and the center of the structural component (if any), and the architectural component is offset from the insertion point as specified by these properties.
|
|
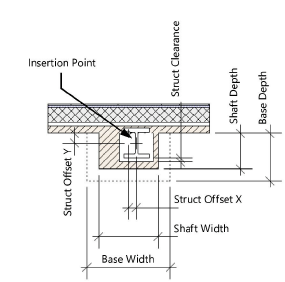
Struct Offset X/Struct Offset Y (Pilaster only) |
For Architectural and Structural components, specify the distance to offset the structural component of the pilaster from the insertion point, in the X and Y directions. The 2D pilaster’s insertion point always coincides with the face of the wall, centered on the architectural component; the structural component and center marks (if any) are offset from the insertion point, as specified by these properties.
|
|
Struct Offset Z (Pilaster only) |
For Architectural and Structural components, specify the distance to offset the structural component of the column/pilaster from the architectural component, in the Z direction |
|
Shaft Type |
For Architectural Only or Architectural and Structural components, draws the column/pilaster with an oval or rectangular shaft type |
|
Shaft Width |
For Architectural Only or Architectural and Structural components, enter the shaft width |
|
Shaft Depth |
For Architectural Only or Architectural and Structural components, enter the shaft depth |
|
Shaft Corner Radius |
For Architectural Only or Architectural and Structural components, enter the corner radius for a rectangular shaft type |
|
Shaft Taper |
For Architectural Only or Architectural and Structural components, select whether to draw the column/pilaster with a classic or straight taper, or no taper |
|
Taper Width |
For a straight or classic taper, enter the taper width |
|
Taper Depth |
For a straight or classic taper, enter the taper depth |
|
Shaft Finish |
For Architectural Only or Architectural and Structural components, displays the class to use for rendering the 3D shaft (selected in the Classes/Materials dialog box) |
|
Use Capital |
For Architectural Only or Architectural and Structural components, select whether to add a capital to the architectural component |
|
Capital Type |
Select to draw the column/pilaster with an oval, oval mushroom, rectangular, or rectangular mushroom capital |
|
Capital Width |
Enter the capital width |
|
Capital Depth |
Enter the capital depth |
|
Capital Height |
Enter the capital height |
|
Capital Corner Radius |
For rectangular capital type, enter the corner radius of the capital |
|
Capital Finish |
For Architectural Only or Architectural and Structural components, displays the class to use for rendering the 3D capital (selected in the Classes/Materials dialog box) |
|
Use Base |
For Architectural Only or Architectural and Structural components, select whether to add a base to the architectural component |
|
Base Type |
Select an oval or rectangular base type |
|
Base Width |
Enter the base width |
|
Base Depth |
Enter the base depth |
|
Base Height |
Enter the base height |
|
Base Corner Radius |
For rectangular base type, enter the base corner radius |
|
Base Divisions |
Enter the number of divisions for the base |
|
Divider Depth/Height |
For more than one base division, enter the depth and height for each divider |
|
Base Finish |
For Architectural Only or Architectural and Structural components, displays the class to use for rendering the base (selected in the Classes/Materials dialog box) |
|
Column ID |
For Structural Only or Architectural and Structural components, enter the Column ID (for reporting purposes, and optionally to be displayed in the drawing) |
|
Display Column ID |
Select this option to display the column ID on the drawing; the ID text is placed at the insertion point of the column/pilaster, at the center of a control point. Click and drag the control point to move the ID to the desired location on the drawing. The ID text attributes can be modified using the Text menu commands. |
|
Column ID Class |
Displays the class to use for the column ID text (selected in the Classes/Materials dialog box) |
|
Classes/Materials |
Opens the Classes/Materials dialog box to assign classes and (optionally) materials to the architectural and structural components of the column or pilaster; see Setting classes and materials for columns and pilasters |
|
Struct Type |
For Structural Only or Architectural and Structural components, select whether the structural component is made of concrete, wood, or steel |
|
Struct Shape |
For Structural Only or Architectural and Structural components, specify whether the concrete or wood structural shape is oval or rectangular |
|
Struct Width |
For Structural Only or Architectural and Structural components, enter the width of the concrete or wood structural component |
|
Struct Depth |
For Structural Only or Architectural and Structural components, enter the depth of the concrete or wood structural component |
|
Struct Corner Radius |
For Structural Only or Architectural and Structural components, enter the structural corner radius for a rectangular structural shape |
|
For Structural Only or Architectural and Structural components, with a Struct Type of Steel, click to open the Select Structural Shape dialog box. Select the structural shape from a library or the current file, and then select the shape’s series and size. |
|
|
Struct Shape / Struct Series / Struct Size |
For Structural Only or Architectural and Structural components, with a Struct Type of Steel, displays the selected steel structural shape symbol name, series, and size |
|
Struct Height |
For Structural Only or Architectural and Structural components, specify the overall height of the structural column/pilaster, including base plate and top plate (if any) |
|
Struct Rotation |
For Structural Only or Architectural and Structural components, enter the number of degrees to rotate the structural component |
|
Struct Clearance |
For Architectural and Structural components, specifies the clearance around the structural component that will be subtracted from the architectural component |
|
Struct. Comp. Class |
For Structural Only or Architectural and Structural components, displays the class for the structural component of the column/pilaster (selected in the Classes/Materials dialog box) |
|
Use Top Plate |
For Structural Only or Architectural and Structural components, select whether to add a plate to the top of the structural component |
|
TP Shape |
Select to draw either an oval or rectangular top plate |
|
TP Width |
Enter the width of the top plate |
|
TP Depth |
Enter the depth of the top plate |
|
TP Thickness |
Enter the thickness of the top plate |
|
TP Corner Radius |
For a rectangular top plate, enter the corner radius |
|
Use Base Plate |
For Structural Only or Architectural and Structural components, select whether to add a plate to the bottom of the structural component |
|
BP Shape |
Select to draw either an oval or rectangular base plate |
|
BP Width |
Enter the width of the base plate |
|
BP Depth |
Enter the depth of the base plate |
|
BP Thickness |
Enter the thickness of the base plate |
|
BP Corner Radius |
For a rectangular base plate, enter the corner radius |
 Setting classes and materials for columns and pilasters
In Architect, you can select the classes and, optionally, the materials to use for the various components of the column or pilaster, and for the Column ID text, if applicable. If a material resource is used to define a component, the material typically provides the fill, texture, physical attributes, and construction information needed for drawings, renderings, and reports.
Basic columns created in Landmark and Spotlight offer a simpler version of this dialog box that allows you to select classes for the shaft, capital, and base components of the column.
To assign classes and materials for Architect columns and pilasters:
Click Classes/Materials from the object properties dialog box or the Object Info palette. The Classes/Materials dialog box opens.
Click to show/hide the parameters.Click to show/hide the parameters.
|
Parameter |
Description |
|
Select Component Finishes |
To control appearance and visibility, select classes for the 3D shaft, capital, and base of the column from the list of classes present in the drawing, or create a new class. Select <Object Class> to place the text in the same class as the column or pilaster object. |
|
Select Component Classes |
Architectural and/or structural components are available, as applicable, based on the component type specified |
|
Class |
Select a class for the component. In addition to classes present in the drawing, architectural component classes include the Wall-Interior and Structural-Columns class standards and structural component classes include the Structural-Columns class standard. |
|
Use material |
Uses a material resource for the component; select a material from the Resource Selector. The material’s fill attribute is used for section views of the object. |
|
Textures |
Select whether the components that use a material should use textures from the class or from the material |
|
Column ID Text |
To control appearance and visibility, select a class for the Column ID text from the list of classes present in the drawing, or create a new class. Select <Object Class> to place the text in the same class as the column or pilaster object. |


